Adding KPIs in ActionPlanner follows the general goal theory, stating that people perform better if a goal is specific and even better if it is measurable. KPI’s can help you make initiatives measurable.
To add KPI’s on an initiative, follow these steps:
- Go to the initiative you wish to add a KPI;
- Access the “Initiative options” in the upper right hand corner of the screen;
- Select the option “Edit initiative”.

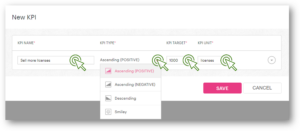
- Proceed to scroll to the section: “Key performance indicators” and click the “Add KPI” on the right side of the section:

When creating KPIs you are expected to as a minimum to fill out the mandatory fields (marked with *). If you for example want to create a “Sell more licenses” KPI, then:
- KPI name = Sell more licenses
- Target = 1000
- Unit = New licenses

Other examples are (KPI name, target, unit):
- Client visits, 15, meetings
- Test products, 3, pilot projects
- Lean production, 15, sprints
You can also make a KPI description to clarify the specifics about the KPI.
You can furthermore set the type of KPI you want. These include:
- Ascending KPIs: A KPI that is increasing over time. More is better e.g. units produced per hour.
- Descending KPIs: A KPI that is decreasing over time. Less is better e.g. number of errors.
- Smiley: Qualitative (rather than quantitative) KPI where report on via a green, yellow or red smiley. Examples are (KPI name): Better at motivating, Client service, Support level, Price level etc.
Now you are ready to save the KPI and create more KPI’s if needed by repeating the procedure above. Finalize by saving the initiative.
The next time the responsible gives feedback on the initiative, he can report on the KPI’s as part of the feedback.

5 Comments. Leave new