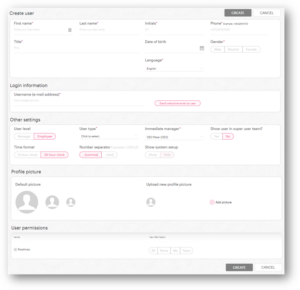
To create a new user, as a super user or admin user, follow these steps:
- Hover your dropdown in the upper right hand corner;
- Click “System setup” and select the option “Edit users”

- Proceed by clicking the “Create new” + button located above right of the user table.

- You are then directed to the “Create user” page.

Now fill out the fields (mandatory fields are marked with *):
- Initials: This initials can be used to search for users
- * First name: First name of the new user.
- * Last name: Last name of the new user.
- * Gender: Male or female.
- Title: Title of the new user (e.g Personal assistant).
- * Phone: This phone number will be displayed in the user profile and will be visible for other users.
- * User type: You can choose between User, Super User, Admin User.
- Mark user as Company Super User?: By checking this checkbox, the user will be listed as a contact person to reach out to, to get help/support.
- * Immediate manager: Align the new user to his/hers immidiate manager
- * User level: Is the user a Manager or employee? Notice that a manager is on a miminum Super User in ActionPlanner.
- Language: Choose between English and Danish.
- Time zone: Select the appropriate timezone for the user.
- * Username: Type in the email address of the user. This email address will be used the username for logging into ActionPlanner.
- Send welcome email to User: After you create a user, a welcome email will be sent out to the new user. This email a link which can be accessed to login for the first time. Note that this link is valid for 24 hours only.Turn off the button if you do not yet want to invite the new user to ActionPlanner just yet. You can always come back and invite the user to ActionPlanner later.
- Profile image: Upload a picture on behalf of a user.
- *Permissions: You can give None, Me/Team, All view permission to the new user (depending on your ActionPlanner subscription).

48 Comments. Leave new
… [Trackback]
[…] Read More on on that Topic: actionplanner.com/2022/09/21/create-new-users/ […]
… [Trackback]
[…] Information on that Topic: actionplanner.com/2022/09/21/create-new-users/ […]
… [Trackback]
[…] Read More on that Topic: actionplanner.com/2022/09/21/create-new-users/ […]
… [Trackback]
[…] Find More here to that Topic: actionplanner.com/2022/09/21/create-new-users/ […]
… [Trackback]
[…] There you can find 88615 additional Info on that Topic: actionplanner.com/2022/09/21/create-new-users/ […]
… [Trackback]
[…] There you will find 28832 more Information on that Topic: actionplanner.com/2022/09/21/create-new-users/ […]
… [Trackback]
[…] Find More here on that Topic: actionplanner.com/2022/09/21/create-new-users/ […]
… [Trackback]
[…] Find More on to that Topic: actionplanner.com/2022/09/21/create-new-users/ […]
… [Trackback]
[…] There you can find 96972 additional Information on that Topic: actionplanner.com/2022/09/21/create-new-users/ […]
… [Trackback]
[…] Read More on to that Topic: actionplanner.com/2022/09/21/create-new-users/ […]
… [Trackback]
[…] Read More on on that Topic: actionplanner.com/2022/09/21/create-new-users/ […]
… [Trackback]
[…] Info on that Topic: actionplanner.com/2022/09/21/create-new-users/ […]
… [Trackback]
[…] Find More to that Topic: actionplanner.com/2022/09/21/create-new-users/ […]
… [Trackback]
[…] Find More on to that Topic: actionplanner.com/2022/09/21/create-new-users/ […]
… [Trackback]
[…] Find More here to that Topic: actionplanner.com/2022/09/21/create-new-users/ […]
… [Trackback]
[…] Read More Information here on that Topic: actionplanner.com/2022/09/21/create-new-users/ […]
… [Trackback]
[…] Info to that Topic: actionplanner.com/2022/09/21/create-new-users/ […]
… [Trackback]
[…] Here you will find 36216 more Information to that Topic: actionplanner.com/2022/09/21/create-new-users/ […]
… [Trackback]
[…] Here you can find 16403 additional Info on that Topic: actionplanner.com/2022/09/21/create-new-users/ […]
… [Trackback]
[…] Read More to that Topic: actionplanner.com/2022/09/21/create-new-users/ […]
… [Trackback]
[…] Find More Info here to that Topic: actionplanner.com/2022/09/21/create-new-users/ […]
… [Trackback]
[…] Info to that Topic: actionplanner.com/2022/09/21/create-new-users/ […]
… [Trackback]
[…] Read More on that Topic: actionplanner.com/2022/09/21/create-new-users/ […]
… [Trackback]
[…] Read More Info here on that Topic: actionplanner.com/2022/09/21/create-new-users/ […]
… [Trackback]
[…] Info to that Topic: actionplanner.com/2022/09/21/create-new-users/ […]
… [Trackback]
[…] Info on that Topic: actionplanner.com/2022/09/21/create-new-users/ […]
order enclomiphene cheap australia
ordering enclomiphene price uk
kamagra pas de prescription
prix réduits kamagra
cheapest buy androxal generic uae
buying androxal canada mail order
cheapest buy dutasteride price usa
ordering dutasteride lowest cost pharmacy
buy flexeril cyclobenzaprine purchase in canada
buy flexeril cyclobenzaprine uk how to get
cheapest buy fildena without recipe
online order fildena medication interactions
buy cheap gabapentin price by pharmacy
how to buy gabapentin cost on prescription
cheap itraconazole usa mastercard
buy cheap itraconazole generic when available
online order avodart generic is it legal
discount avodart generic switzerland
how to buy staxyn us pharmacies
Buy staxyn on line no perscription
cheap xifaxan overnight no rx
purchase xifaxan generic effectiveness
discount rifaximin purchase in the uk
purchase rifaximin canada internet
kamagra bez rx
canada drug.com kamagra
… [Trackback]
[…] Find More here to that Topic: actionplanner.com/2022/09/21/create-new-users/ […]
… [Trackback]
[…] Find More Info here on that Topic: actionplanner.com/2022/09/21/create-new-users/ […]
… [Trackback]
[…] Info on that Topic: actionplanner.com/2022/09/21/create-new-users/ […]
… [Trackback]
[…] There you will find 24203 more Information on that Topic: actionplanner.com/2022/09/21/create-new-users/ […]
… [Trackback]
[…] Find More here to that Topic: actionplanner.com/2022/09/21/create-new-users/ […]
… [Trackback]
[…] Read More here to that Topic: actionplanner.com/2022/09/21/create-new-users/ […]
… [Trackback]
[…] Find More on to that Topic: actionplanner.com/2022/09/21/create-new-users/ […]
… [Trackback]
[…] Read More on on that Topic: actionplanner.com/2022/09/21/create-new-users/ […]
… [Trackback]
[…] Find More Information here on that Topic: actionplanner.com/2022/09/21/create-new-users/ […]